How To:

Campervan Water & Plumbing

READ MORE IN NEW CONVERSIONS BOOK

Find lots more details in the NEW Self Build Campervan Conversions book

Running Water In Campervans

1. Running Water Systems In Campervans

Pretty near the top of most people's wish lists in a basic campervan conversion would be a sink with a tap and running water.  It's pretty easy to install a cold water system, so why not!

Water systems and general plumbing in Campervans tend to work slightly differently to water systems in the home.  For a start, water needs to be pumped to compensate for the lack of mains pressure, and you need to install tanks to hold your freshwater supply and wastewater.

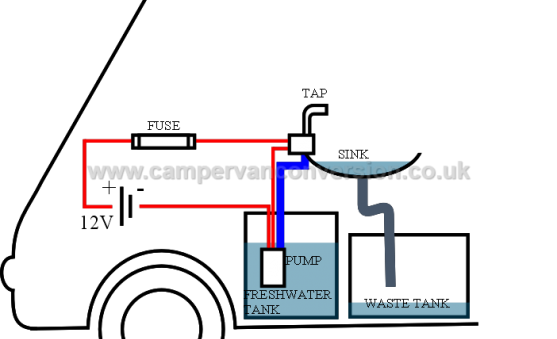
One of the most DIY conversion friendly approaches is detailed here - in principle, all you need is a freshwater tank, with a 'drop in the tank' submersible campervan water pump taking the water to where it is needed.

Campervan Water System Diagram

2. Planning Your Campervan Water System

As with everything in your Campervan Conversion project, a bit of planning and forethought is required to get a user friendly Campervan Water System that doesn't cost the earth.

The sink and tap are the main items on show, and it is worth putting some thought into where you want this to go in your van. There are many space saving solutions available, with combined sink and stove units or sinks with lids that fold down to leave a work surface.

For small campervans (e.g. T5's), having space for a reasonable sized water tank (a 20 - 30 litre tank or cannister gives enough water for just under a week if you're primarily using it for drinking and cooking).  Remember you will need to access this to fill the tank frequently but it also makes sense for this to be reasonably near the sink so as to cut down on the length of pipe required and reduce pressure on the small water pump.  You will also want to remove the tank occassionally to give it a good clean, so try to make it relatively easy to remove - a plywood panel screwed over your tank so that once a year or so you just have to unscrew a few screws to take the tank out completely is a good way to do it - this also makes replacement an easy proposition.

Equally important is a wastewater tank - preferably a good size so you don't have to empty it every few washes, again sited near and below the sink so gravity can do a good job of emptying your sink.

Importantly you will also need access to a power supply for the water pump.

Micro Switched Campervan Water System

3. Pressure Systems Or MicroSwitched Systems

Micro-switched Systems
In a micro-switched system each tap contains a tiny switch. When you turn a tap on the switch inside it is activated and the water pump runs. Turn the tap off and the switch is turned off again stopping the pump.   In a campervan with one cold water tap, this is a neat system.  For small campervans, micro-switched taps are the way forward and our basic campervan water system kit includes a perfect space saving folding one which allows you to tuck it away so the sink can be covered and double as a work surface. In a larger system having many microswitched taps can lead to quite complex wiring and you will usually want to install a pressure switched system instead.

Pressure-switched Systems
Water systems in bigger campervans and motorhomes are usually pressure sytems.  A pressure switched system contains only one switch for the whole system (rather than one in every tap) and the taps don't need to have microswitches in them.  Normally a pressure switch would be used in conjunction with a bigger 'diaphragm' or pressure pump (rather than a small submersible pump).  Instead of the switch being in the tap, there is a pressure switch connected into the system close to the pump.  Water in the system is kept under pressure by being trapped between the taps and a one-way valve at the switch. When a tap is turned on, the water pressure drops. This operates the pressure switch (which is wired to the pump) and turns the pump on. When the tap is turned off the pump continues to run until sufficient pressure has developed to trip the pressure switch off.  The tricky part can be getting the pressure switch adjusted correctly.

With both systems you need to keep an eye on the amount of water in your storage tank so you don't burn your pump out trying to pump fresh air.

Campervan Plumbing

4. Campervan Plumbing

It is definitely worthwhile using modern flexible or semi flexible push-fit plumbing in your campervan. Unlike in a house, the van will not be static and nor will the plumbing, so it is definitely good for your pipes to be able to be flexible to prevent leaks occuring over time.

If you are a bit daunted by the whole plumbing process, it is best to think of your system one length of pipe at a time. Each end of hose will connect two items, for example a submersible pump and a microswitched tap. Both of these components will have some form of connector, which will vary from model to model but in general consists of something slightly larger than the inside of the pipe that will stretch the end of the pipe to ensure no water can escape. You may have to heat the pipe in a cup of hot water to achieve this. There are two common examples of pipe fittings in the pictures below.

To ensure a snug fit at each end of the pipe, you can use jubilee clips to cinch the fittings together. If you find yourself with an unusual problem you can generally rectify it with a selection of standard plumbing connectors and washers.

Campervan Water System Electrics

5. Water System Electrics

Just like the plumbing, the best approach here is to think of your electrical system in terms of individual wires. You will need to connect from your leisure battery to your water system via an appropriate fuse. In simple terms each component will need to have its own 'circuit' running from a power supply, to a switch, to the component and to earth. Earth can be a bolt into the van, you do not need to connect back to the battery.

Many components, for example microswitch raps and submersible pumps, come with a length of electrical cable preattached. All you have to do is add a section of wire between your components, we find an easy way to get a good connection is by using spade connectors. Be sure to insulate your cable joins so no metal is exposed in your finished circuit.

Before you connect to the battery to power the circuit, ensure that all of your cables are insulated and connected, and all of your components are in the correct order. In a simple microswitch tap system the wire will run from the fusebox, to the tap, from the tap to the pump, and from the pump to earth. Turning the tap on will complete the circuit and turn on the pump, which will pump water through your hose and into your sink.