Bodywork
| Shuttle 88's - Task: Base Vehicle | |
| Write up for their project Shuttle 88, Veronica, Katherine | Status: 
|
Click on images to enlarge - full task gallery at bottom of page
Started prepping the bodywork for filling, welding etc, and oh dear, its a bit more rotten than i first thought. The small hole in the roof over the passenger side of the van turned out to be about 5 square centimetres by time i had knocked out the rust and old filler. Another large hole was opened up over the driver side of the vehicle, as well as the holes and rusty bits round the windows expanding rather alarmingly. Also a new unknown spot has been revealed under the nearside front window!
well, a good old clean up with a flap disc and some emery paper has given me an idea of the extent of the rot and rust, nothing that cant be fixed.
I have started filling in the smaller holes with p40, whilst the larger problem spots will need welding.
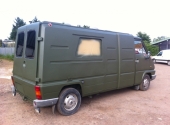
So a couple of months have passed and I decided that the bodywork was too big of a job for me to do myself. I managed to garner the assistance of a good body work man to do it for me, very good. As we were discussing the very bad rot and tin worm around the windows a plan was formulated. The original idea was to take out the side windows, repair the rotten areas and then refit the original windows. However, the original windows were all cracked and single glazed (v. Bad for insulation). So, new idea. Fill in the front small side window on the near side permenently, temp fill the other to windows on the near and off side and recut the filler metal for replacement windows. Double glazed plastic caravan windows sourced from a colleague for £40 to be exact. New frames were made up from 1 inch MDF to hold the catches of the new windows.
Also other areas of rust and rot were cut out and filled as well as a few dinks and dings filled and squared out, including an area of bad rust on the inside of the rear door and some tidying up of the roof over the cab area.
Another good find was some rubberised gutter paint to put over the guttering on th roof of the van to seal some of the areas that were leaking through the spot welds. Cheap and effective. The new pictures only show part of the work done so far, more to come in the future.
Next on the list of to dos is priming and painting.
So a few months have passed and the van is definitely looking a lot better, fact it is pretty much finished outside! All the filling and welding has been done and she has been sanded down and painted!
It took 10 hot sweaty hours with the orbital sander to get all the old orange peel paint off her. Then clean the roof up ready for the rubberised roof paint to go on in the guttering and pretty much everywhere where the water will sit on the roof. That done all that was left was to mask her up and then get the spray gun out.
Thankfully my consummate dad did all the primer and paint for free!
Then the final fitting of the windows was carried out, so now she is (?) completely watertight.
All that is left on the outside of the van is the bumpers, wheels and little details.
Next step, tackle the innards of the beast.


